|
|
 |
| Search |
|
|||||
|
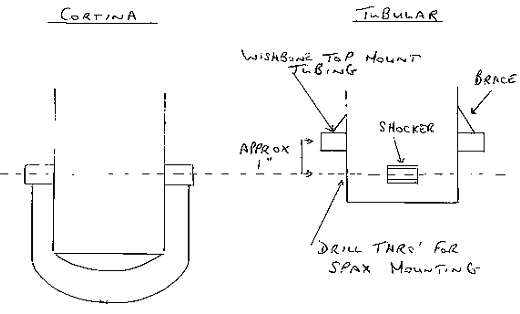
At the various shows I have attended, there has always been someone who would like to switch to tubular wishbones from the traditional Cortina pressed steel type. Here are my experiences and method of doing the switch. Please note that any dimensions are approximate and it was very much a try it, fit it, undo it, fit it again, undo it again before finally getting it right. Exactly in line with the spirit of Locust building. Remember not to cut anything off the chassis unless you are really sure. For information, the suspension bushes are Cortina mark 4. The top ball joint is Ford Transit Van mark 2 and the bottom ball joint is again Cortina mark 4. One complex job was to get the wheels upright and allowing for adjustment of the transit top ball joint. There seems to be no end of different Ford chassis' out there, so really take time to measure up and trial fit before you get past the point of no return. The work I had to do to get things right may be completely different to what you need to do. Unfortunately I bought the wishbone set with dampers / springs from T & J Locust as a package. So I have no clue as to the Spax size or spring rate. I would expect other club members may be able to shed some light. First job, cut off the Cortina spring mounting plate with my favourite tool an angle grinder. I cut off the excess square section tubing where the Cortina mounting plate was fixed, this was tidied up with an end plate. The tubes, which were welded in for the top Cortina wishbone mount were cut off - I used this hole to bolt the spax shocker top location.
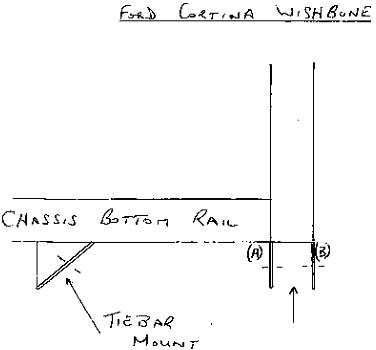
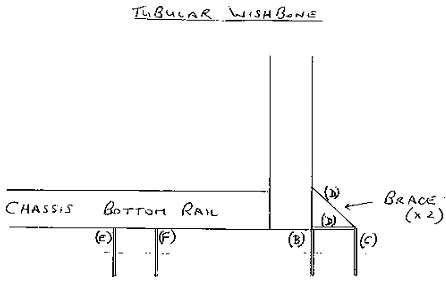
I then drilled through & welded in a length of tubing one inch inwards - this is the new location for the wishbone. Some of you will be aware that the weld around the tubing is prone to cracking, I added a triangular shaped brace either side as extra support. Out with the angle grinder again cutting off the Cortina tie bar mounts on the bottom chassis rails. I then measured the gap between the two brackets (A & B) forming the original Cortina wishbone mount. The rear wishbone bracket (A) was cut off and a new bracket (C) welded on in front of the remaining bracket (B) using braces (D) welded onto the front chassis rail. Now the tricky bit, with the bushes fitted to the wishbone I bolted the forward leg in between (B & C) which enabled me to weld bracket (F) in place. Bracket (E) was then similarly welded using the same spacing as between (B & C). Doddle!
Seems as clear as mud to me, I can't believe it but it all works well and it did pass the SVA test. If anybody needs any more info, give me a ring on 01325 358731 or e-mail me at: - d.hancock2@ntlworld.com Dave |
|||||
|
|
||