|

|
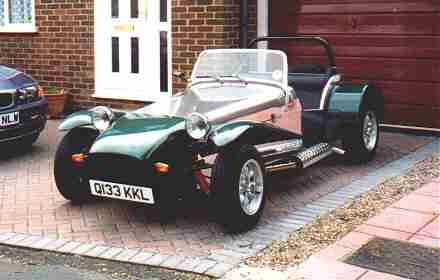
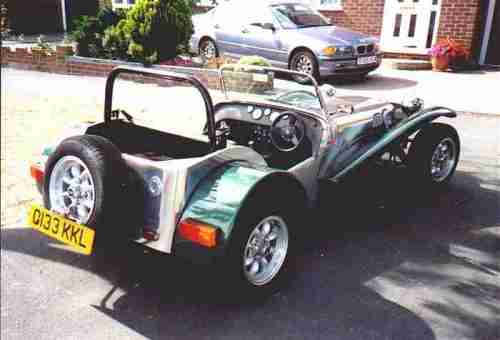
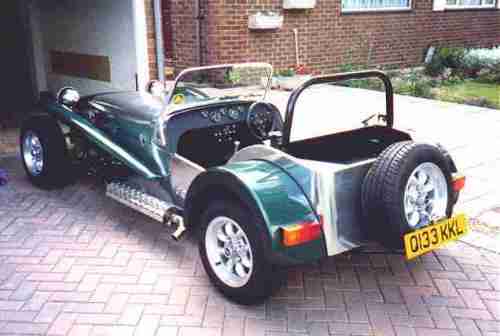
Q133
KKL - Build report by Phil Manship
I
first had the idea of building a kit car about ten years ago, after
reading all the magazines on the subject I decided that the Lotus
seven style was the car for me. I sent for some information to several
manufacturers, the one that caught my eye was the Locust, Why the
Locust? because it was the only one that I had a hope in hell of
affording. Well that's not entirely true, the idea of a home made
wooden body tub rather than a moulded glass body appealed to me,
the Locust seemed more of a challenge. However all things considered
(money mostly) I decided not to go ahead at that time. Any idea
of building a kit was put very much on the back burner, indeed I
abandoned all idea of kitcar construction for the foreseeable future.
My interest was re-awakened back in April 1995 when I heard of a
kit car show held locally at Chatham dockyard but unfortunately
I was unable to attend due to prior arrangements and forgot about
it again until the local paper reports of the event the following
week, there was a short write up on it and a picture of a Locust.
Even then I didn't consider getting started again until over a drink
with some friends I mentioned that the show had been on and wouldn't
it be nice to build a car? "Why don't you?" was the reply from all
present, including my wife Debbie. The seed was sown and over the
next couple of days I bought a few magazines and started reading
up all over again, I did my sums and decided that if I could go
ahead it would have to be on a tight budget, no Caterham for me!
It was only
six months or so previous that I'd had a clear out and threw out
all the old brochures I had received all those years ago, so I started
to ring around to ask for information, looking at the adverts for
the Locust I noticed that the company was no longer based in Yorkshire
but was now in Gillingham, just a couple of miles from my house,
I spoke to White Rose Vehicles who sent the information and invited
me to contact a Locust builder who both live very close, in order
to arrange to see his car, a couple of days later my good friend
John Bardoe (who is also now Locust owner) and I turned up at Dave
Chalks house as arranged and we were delighted to find that Peter
Lathrope was also there with his car, we were both very impressed
with these fine examples, one hour and a white knuckle ride in Dave's
car later and I was hooked.
At that time I didn't have the luxury of a garage on my property,
just a lockup in a block round the corner, no electricity and just
big enough to squeeze in a family car. It was for this reason that
I decided to build my car at my mums place, she had an empty garage
with power laid on and was glad of the extra company. True mums
garage is no larger than mine and she does live about four miles
away which means that I couldn't just pop into the garage and fiddle
when there's nothing on the box for half an hour, but I didn't want
to rush the build, this was meant to be a long term project. At
the outset I decided that if after a couple of years I had achieved
something that looked something like a car, I would be well pleased.
Another advantage of "building at mums" is that I was almost guaranteed
a cup of coffee on the hour every hour.
I finally got started back in May 1995, I collected the plans and
manual from White Rose and studied them carefully, ordered three
sheets of 18mm ply and started to paste the plans to them as per
instructions. With all the patterns eventually glued as flat as
possible to the plywood the next step was to start cutting them
out. I visited the local tool hire shop and bought a weekends worth
of use of a very tasty looking "industrial" jigsaw, the man said
that it would easily cut through the required thickness of wood
and furnished me with the appropriate blades, I took them home confident
that the weekend of work ahead would be all the easier as a result
of spending a few extra pounds on the right equipment.
Sunday morning turned out to be fine and sunny, just as well as
the only place with enough room to handle the 8' x 4' sheets was
my back garden, John, who had volunteered to give moral and physical
support had arrived nice and early, wives and children were banished
to sell some clutter at a boot fair and John and I had the place
to ourselves, we set up a pair of B & D workmates to support
the 8' x 4' sheets of ply and began to wield the jigsaw, it soon
became apparent that for straight cuts a hand saw was far superior
to the jigsaw as it was far more controllable and produced a straighter
cut, the jigsaw was the obvious choice for the curved bits and a
small B & D circular saw with a tungsten carbide tipped blade
was very handy for the angled cuts (undercuts), it was when I was
using this that I neatly sliced the top of one of my workmates almost
in half, (including steel inserts). As I mentioned earlier the build
manual suggests that when cutting out duplicate panels you should
cut through two thicknesses of wood to achieve identical panels,
I'm sorry but this didn't work for me, even using the "super dooper"
jigsaw, the blade wandered all over the place and the two panels
came out anything but identical, a far better method was to cut
out the first panel as accurately as possible using the paper template
and then to use this first panel as a template to mark out the second
panel directly on the wood, then cut out the second panel , clamp
both together and clean both up at the same time, result, two identical
panels, sorted! At the end of that eventful and satisfying day we
had reduced the three sheets of ply to a neat pile of what looked
like very expensive fire wood. Whilst clearing up the mess in the
garden I couldn't help noticing a huge amount of empty beer cans
amongst the off cuts and sawdust, well it had turned out to be a
very warm day!
Over the weeks that followed I continued construction of the body,
the rough cut panels were cleaned up and trial fitted to together,
most were o.k. after cleaning up but a couple needed to be remade,
this posed a problem as I didn't have enough ply left to remake
them. The solution was to order another 8' x 4' sheet this may seem
extravagant but I also needed a flat, smooth surface on which to
build the body, I found that if I laid the extra sheet across my
two B & D workmates with a four foot length of 4" x 2" timber
clamped in the jaws of each, I could obtain a perfectly level and
flat surface on which to work, any panels which needed to be remade
were simply cut off the building board, which is now only 6' x 4'
but is still as adequate size for building. I plan to use this board
later when skinning the body as I will need somewhere flat to mark
out and cut the aluminium sheets.
I
decided to join my body panels by gluing and screwing direct into
the edges of the plywood using 2" x No.8 chipboard screws (twinfast)
every 3.5", I found that if the correct size pilot hole was drilled
there was no danger of splitting or delamination of the ply, whilst
the glue was still wet, to ensure the joints were square I fixed
lengths of 25mm x 25mm x 3mm aluminium angle using 15mm x No.8 chipboard
screws countersunk into the aluminium every 3.5". This method appears
to be quite strong as, when a few weeks later I decided to remove
some of this angle to do a modification I found it had stuck fast
due to the white glue oozing from the joint, it proved totally impossible
to remove the angle so it stayed put. The vertical angled joints
between the flanks and the valances however are a different story,
with my limited carpentry skills I found it very difficult to achieve
a close fitting joint here and temporarily fitted an aluminium strap
to support the joint whilst the glue set, I plan to reinforce this
area on the inside with glass fiber resin, glass cloth and kevlar
tape.
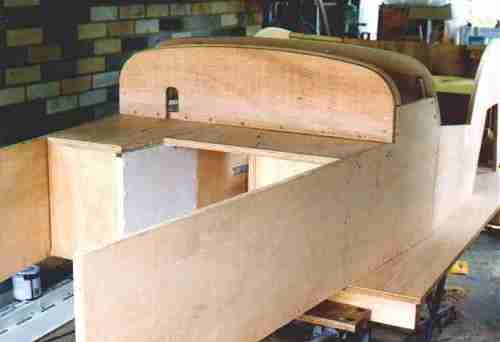
When
the tub was almost complete a couple of ideas came my way courtesy
of Peter Lathrope and Dave Chalk, Peters idea which he has subsequently
published in this newsletter was to cut away part of the drivers
side tunnel panel to stop the rear end of the propshaft from fouling
the woodwork, so out came the jigsaw, the offending area was removed
and plated over on the inside with a galvanised steel plate. Dave's
idea was to make the drivers side gearbox cover from 6mm ply rather
than 18mm to give a valuable 12mm extra foot room around the pedals,
again this advice was really too late for me as this area was already
finished, however a large portion of the side panel was removed
with the jigsaw and plated on the outside with a similar steel plate
giving a full 18mm extra room in the footwell. Both of these mods
are obviously worthwhile but I would recommend that they are built
in originally rather than added as afterthoughts.
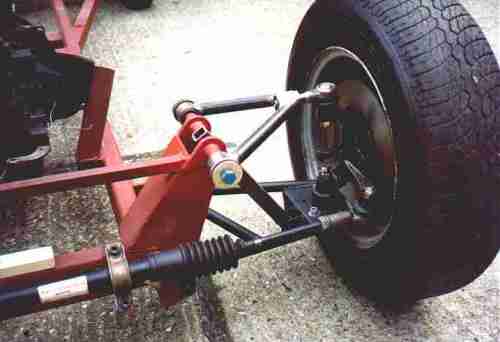
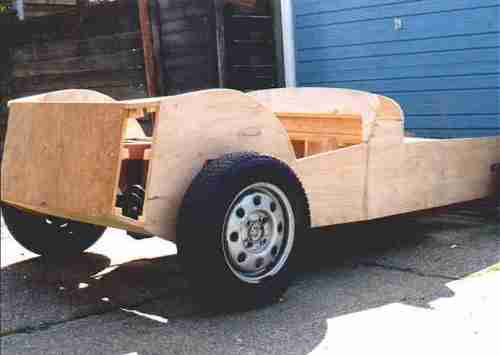
It was now September 1995 and the body was all but ready for skinning,
before I did that I wanted to trial fit it on the chassis which
was over at Johns place having just been converted ready for fitting
the "new" front wishbone setup. This involved removing
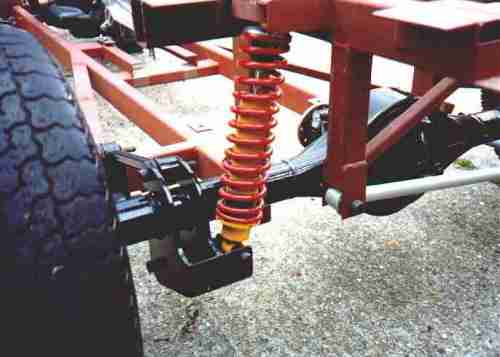
most of the original spring pans to make room for the upper wishbone,
I had also decided to mount the upper end of the shock absorber
in the centre of the long bolt on which the wishbone pivots, this
needed more modifications including beefing up the top tubes to
take the extra load, I didn't know if this would work but I thought
it would look neater than the original.
Any
thought of a single donor for the engine and running gear was out
of the question, as I have mentioned, space was at a premium, so
I had to resort to sourcing my donor parts wherever I could, this
was obviously a lot more expensive, I'd heard tell of complete donor
Mk II 1600 Escorts being bought for less than £100, but even if
I had been able to find one of these I wouldn't have had the room
to store it whilst it was reduced a kit of parts.
Due to the cold weather, progress over the winter was slow, when
I got the chassis back the priority was to get it "rolling"
so that I could move it in and out of the garage, this would make
more room to get the body finished. As I had decided to mount the
top of the front shock absorbers on the "long bolt" it
became obvious that the originally specified "Mini" coil
overs were going to be far too long.
I decided that the only thing to do was to try to find a coil over
which would fit the space I now had available, after a lot of phone
calls I found there was no off the shelf solution, however I contacted
Chassis Dynamics who offered to make some specials to my specification,
not only that but the cost was the same as their standard range
which was considerably cheaper than the Spax units.
Several other problems were identified around the front wishbones
at this time, most worryingly with the wishbones mounted as per
instructions and the recommended ride height set with blocks under
the chassis there was an alarming lack of movement in the suspension,
the wheel only moved around 15mm upwards before the upper balljoint
ran out of movement. I was put in touch with the man who had designed
the wishbones who visited me and acknowleged that there was indeed
a problem, he specified a different balljoint with more movement
and slightly altered the angle of the top wishbone and the problem
was solved. There is now plenty of movement available.
Whilst waiting for the coil overs to be delivered the back axle
which I had picked up at a breakers yard was cleaned up and the
old spring mounting pads removed, it was wheeled into position at
the back of the chassis the swinging arms assembled and aligned,
after carefull allignment and measuring of its position the swinging
arm brackets were tack welded to the axle tube, the whole thing
removed again and stripped, then final welding was done. A good
clean up was followed by several coats of sperex competition black.
The hub bearings were renewed whilst the whole thing was in pieces,
the back plates reassembled, new shoes, springs and wheel cylinders
fitted and it was ready to bolt back on. Seven weeks later the coil
overs were delivered and to my relief they fitted, the front end
looks very neat with the shocks mounted like this. With that done
the chassis was rolling.
By
this time it was the middle of 1996 and things had slowed down somewhat
we were in the throes of a house move, the Locust build was put
on hold for the duration but the good news was that the "new"
house we were moving to not only had a garage on the property but
there was room in the garden to build a decent sized "workshop".
We moved in September and the workshop was up by the end of November.
After we settled in we were back into the cold winter weather and
the workshop came into its own. It was now time to test fit the
body on the chassis and a couple of volunteers were found to give
me a hand, only a couple of minor changes needed to be made to the
bodywork around the front suspension towers otherwise all was fine!
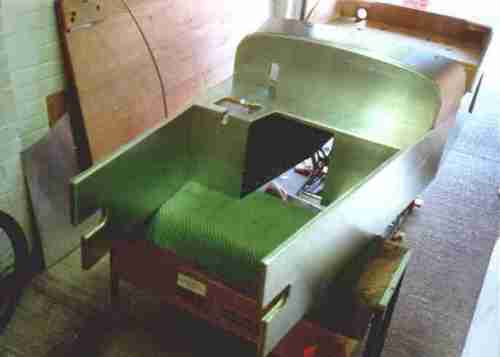
The
body was now ready for "skinning" in aluminium but the
glue for this job needs a temperature of 70 degrees minimum to cure
properly so I decided to delay this until the spring, there were
still hundreds of other things to work on in the mean time so the
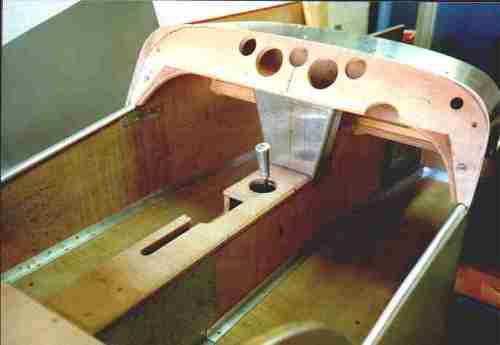
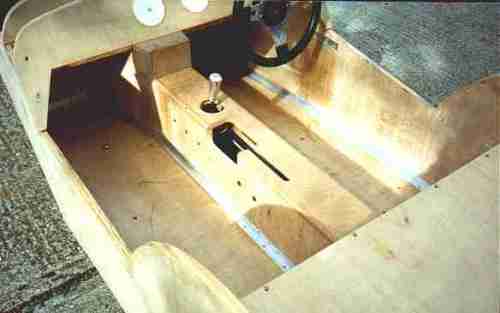
time wouldn't be wasted, during this time I worked on the steering
column, fuel tank, hand brake, gear box mount, instrument layout,
radiator mounting and the whole chassis was stripped again and painted
for the last time.
O.K. so now it's spring 1997 and for the last couple of years the
government has been threatening to bring in the dreaded Single Vehicle
Approval tests, there have been several dates quoted for the start
of the tests but these have all come and gone, cancelled at the
last minute, there is no doubt that the scheme will start sooner
or later but it still looks as if I may need to prepare my Locust
with the SVA in mind, I still seem to have lots to do!
I
decided to bring the body to my house for skinning, mostly because
of the limited space at Mums place, the chassis was getting in the
way. We managed to get the body in the back of a Ford Transit belonging
to a friend of a friend and set it up on trestles in the garage.
Ray Clark had already skinned a couple of Locusts and had made a
great job of them, he offered to give me a hand, I wasn't really
looking forward to this stage so I gratefully accepted Ray's offer,
working at a steady pace it took a couple of days to complete the
skinning and it seemed a good idea to cover the under bonnet area
as well, it looked so different with the ally on and I was very
pleased with the result.
I
spent the rest of the summer working on A standard 1600 engine which
I purchased from a local kit car manufacturer I rebuilt it myself
in my new "workshop", after a strip down I found it was
only necessary to fit new rings, shells etc. Once it was in one
piece again I took it down to Mums and trial fitted it in the chassis
with the gearbox, measured up for the prop shaft and had the original
shortened to suit.
With the body finished the same chap with the Transit was bribed
to do the return trip and the body once again re-united with the
chassis. Although it now looked more like a car it was now obvious
that I still had an awfully long way to go, the bonnet had to be
made and fitted, the wiring had to be done, the dashboard had to
be finished, the wings and nose cone had to be finally fitted, not
to mention all the "plumbing" for the engine and the exhaust
system!
I plodded along through another winter, working my way through a
list of jobs which didn't seem to get any shorter and by the spring
of 1998 I heard that the SVA was being delayed again, this time
until July 1st 1998. I'd been keeping an ear to the ground
regarding any more delays to the SVA and got the distinct impression
that this really would be the final delay.
It was as a result of this last delay that I decided that if I were
able to spend a little more time on my build I could be very close
to being ready for an MOT before the SVA was obligatory. With this
in mind I managed to arrange for a very nice man with a car transporter
to pick up my car from mums and bring it home for me. With the Locust
at home it meant that I would be able to spend a lot more time on
the car in the evening and everything seemed to be working out fine.
The idea was to get the car finished in its most basic "MOTable"
form, i.e. no lighting except brake lights and no windscreen or
wipers etc. I wasn't particularly worried about putting the car
through the SVA especially as I would qualify for the exemptions
given to builders who purchased their kit before January 1st this
year. However, the cost of the test at £165 seemed like an unnecessary
outlay when I could get the same result for the price of an MOT
test, also there's nothing like a deadline when it comes to getting
a sluggish build back into top gear!
Towards the end of June 1998 things still didn't seen to be on schedule
for the first of July so I decided to take four days off work and
really try to get things moving, but half way through my long weekend
it still seemed that I had an awful long way to go and there was
only just over a week to the deadline. During a surprise visit from
Dave Chalk and Peter Lathrope I was convinced that I was actually
nearer to being ready for the test than I had thought I was. What
had I got to lose? "Take it for the test!" they said, "if it fails
at least you know what you've still got to do!. If you don't have
it tested now, you won't have time to sort it out anyway and who
knows you may get a pass, it looks ready to us!". This was late
Friday evening and there were several things which still had to
be done; mirrors and final suspension securing etc. I worked the
whole weekend and on Monday morning I thought it was as ready as
it would ever be.
Frantic phonecalls were made to insurance companies and the MOT
station, an appointment was made for three thirty that afternoon.
A quick phone call to the vehicle registration office in Maidstone
and I discovered that unless I got my paperwork to them that morning
they wouldn't be able to arrange an inspection till after July 1st.
After the phone call I was there in a flash, paperwork handed over
and an inspection arranged for Thursday afternoon (June 25th). if
everything went well I should both just make it!
By now it was about 12:30 and I still hadn't even test driven the
car further than the length of my very short driveway. A road test
was clearly needed, I decided to take the car for a quick blast
around the block and in general I was very pleased, it went round
corners o.k. and the ride was quite comfortable, sure it went o.k.
but there were next to no brakes, now was the time to panic! More
frantic phone calls to Dave Chalk and he was there in no time helping
me to bleed the brakes again. Another test drive and things were
very much the same, it would stop but it didn't seem to be up to
MOT standard. The only thing to do was to re-adjust the brake pedal
to give more travel and re-set the brake light switch. Twenty minutes
later and everything was re-assembled just in time for me to set
off for the MOT test centre. I didn't have time to enjoy the drive
there as I was too busy thinking about all the problems the tester
could find. I must say, the weather couldn't have been better for
a first drive, bright, sunny and the forecasted showers holding
off for the duration.
When I arrived the tester was in the process of writing out a failure
slip for a very nice looking newly restored Mini, it had failed
on brakes! The owner was livid! Just before he drove my car onto
the ramps a woman came to pick up her Peugeot, he handed her a failure
slip. Yes, you guessed it, brakes! This did nothing for my nerves
but the tester seemed friendly enough and was genuinely interested
in the car, twenty minutes or so later the man was writing out another
slip, this one was the right colour, I'd passed!!
The drive home was altogether more enjoyable as could easily be
seen from the silly grin all over my face. I was quite surprised
how good everything felt, hardly any rattles and bumps and to my
knowledge nothing actually fell off!
Two days later on the day of the inspection and registration it
was a very different story. The day was very dull and full of heavy
showers. The Maidstone registration office is about 15 miles from
home and I'd hoped that I could get there and back between the showers
(you will remember that I had no windscreen). When the time came
for me to set out it was looking grim. The black clouds were rolling
in again but waiting any longer would mean missing my appointment.
Working on the assumption that with no windscreen, if it rained
I was going to get very wet, I decided that I would get the least
possible amount of clothes wet and went in jeans and open neck shirt.
Of course as soon as I left home the heavens opened and despite
sheltering under the awning of a petrol station for ten minutes
on the way, when I arrived I was wetter than a thing which was very
wet indeed. By now of course the rain had stopped and I dripped
my way into the registration office and announced my arrival. Ten
minutes later the inspector had checked the chassis number and issued
the registration number,
Q133
KKL was born!.
I
was very pleasantly surprised with the way the car performed on
the way home and although I shouldn't have, I couldn't resist putting
my foot down (just a little bit!) and very soon with the sun out,
both Locust and I were literally home and dry!
Now that I have the test behind me and (technically) the car is
road worthy I can relax a little and concentrate on getting the
car finished. I'm sure things will be even better once I've fitted
the windscreen and with lights, I may be able to take her out after
dark.
I
must thank Peter and Dave for persuading me to go for the test,
if I'd left things any longer I wouldn't have had time to "beat"
the SVA. Thanks also to Ray Clark and John Bardoe and to others
too numerous to mention, whose help and encouragement over the last
three years or so, have kept me going. Most of all, thanks to my
long suffering wife who has already had a three year taste of "Locust
widowhood" and has never (well hardly ever!) complained and
has always been supportive and encouraging, It's nearly over Debbie,
another three years should see it finished!!!
.......
Phil
|
|
